TorchServe
本文主要解决在 TorchServe 模型拉取时,存在的中心化的模型仓库带宽瓶颈问题。 当在 TorchServe 下载模型的时候,文件相对较大且会有并发下载模型的场景。 这样很容易导致存储带宽被打满,从而引起下载过慢的情况,影响推理服务的使用。
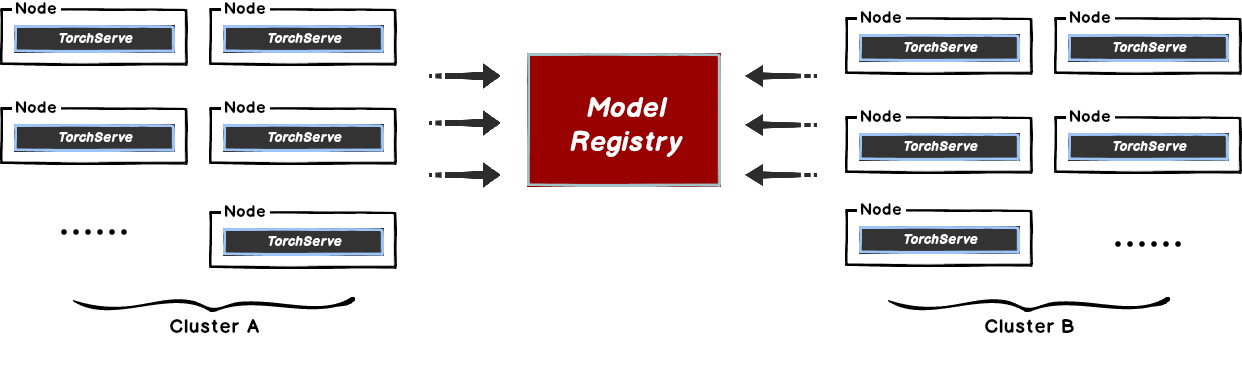
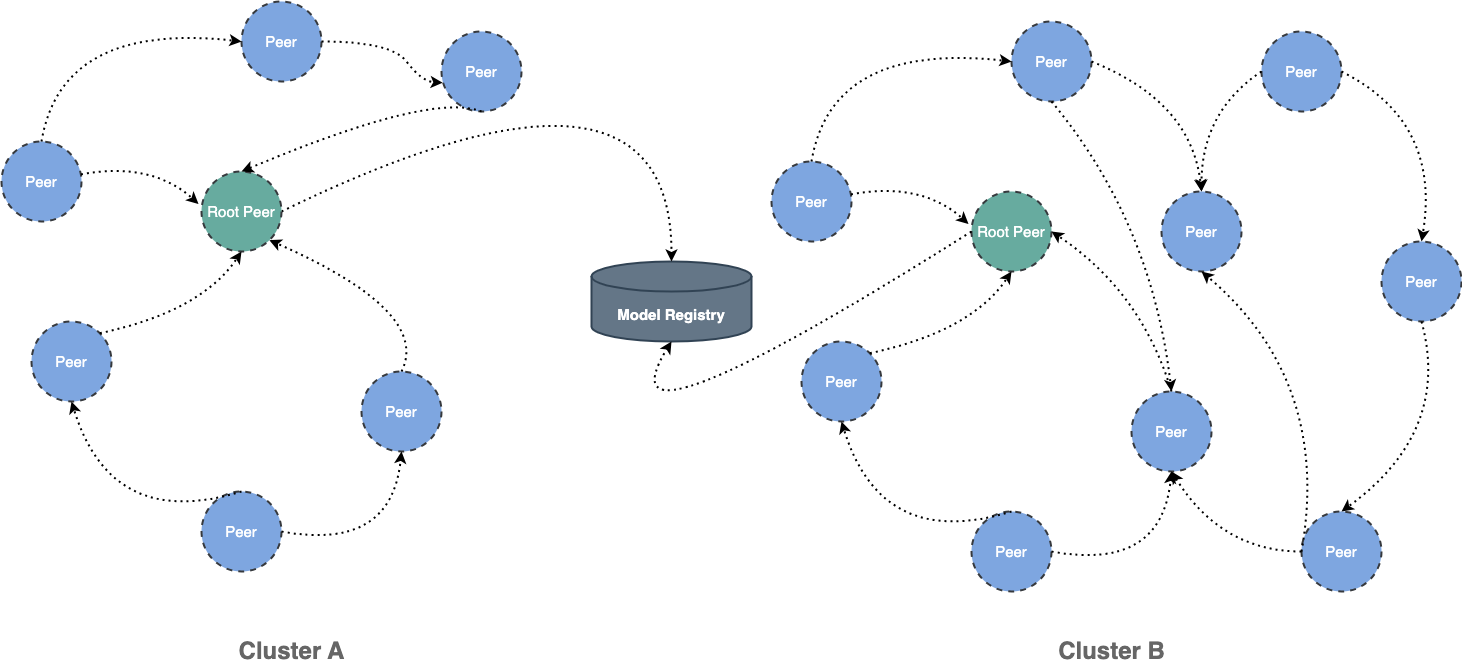
这种方式比较好的解决方案是使用 Dragonfly 的 P2P 技术利用每个节点的闲置带宽缓解模型仓库的带宽压力,从而达到加速效果。 在最理想的情况下 Dragonfly 可以让整个 P2P 集群中只有一个节点回源下载模型,其他节点流量均使用集群内 P2P 内网带宽。
架构
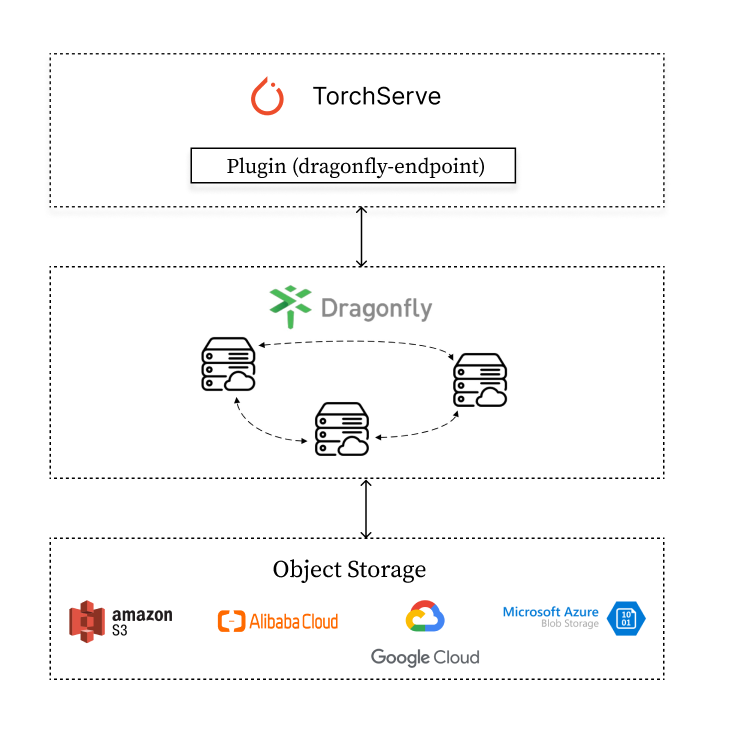
TorchServe 通过集成 Dragonfly Endpoint 插件, 发送模型下载请求到 Dragonfly,Dragonfly 作为代理去对应的 Object Storage下载模型并返回。
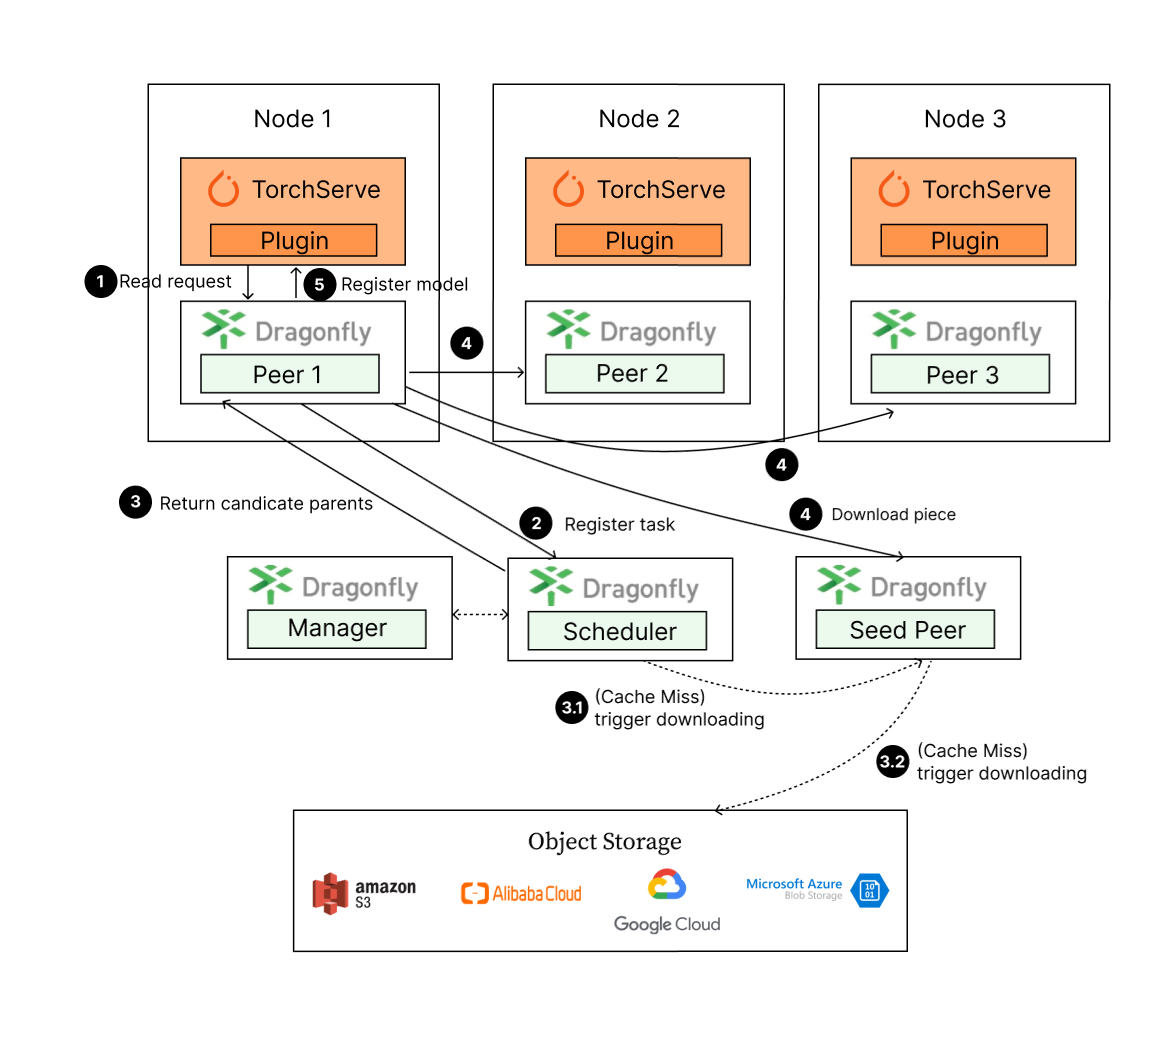
模型下载步骤:
- TorchServe 发起模型下载请求到 Dragonfly Peer。
- Dragonfly Peer 会到 Dragonfly Scheduler 注册任务。
- 返回合适的一组父节点给 Dragonfly Peer 进行下载。
- Dragonfly Peer 从合适的一组父节点分片下载文件。
- 模型下载完成之后,TorchServe 会进行模型注册。
部署
通过集成 Dragonfly Endpoint 到 TorchServe 中,使下载流量通过 Dragonfly 去拉取 S3,OSS,GCS,ABS 中存储的模型文件, 并在 TorchServe 中进行注册。TorchServe 插件维护在 dragonfly-endpoint 仓库中。
依赖
| 所需软件 | 版本 | 链接 |
|---|---|---|
| Kubernetes cluster | 1.20+ | kubernetes.io |
| Helm | 3.8.0+ | helm.sh |
| TorchServe | 0.4.0+ | pytorch.org/serve/ |
注意: 如果没有可用的 Kubernetes 集群进行测试,推荐使用 Kind。
Dragonfly Kubernetes 集群搭建
基于 Kubernetes cluster 详细安装文档可以参考 quick-start-kubernetes。
准备 Kubernetes 集群
创建 Kind 多节点集群配置文件 kind-config.yaml, 配置如下:
kind: Cluster
apiVersion: kind.x-k8s.io/v1alpha4
nodes:
  - role: control-plane
  - role: worker
  - role: worker
使用配置文件创建 Kind 集群:
kind create cluster --config kind-config.yaml
切换 Kubectl 的 context 到 Kind 集群:
kubectl config use-context kind-kind
Kind 加载 Dragonfly 镜像
下载 Dragonfly Latest 镜像:
docker pull dragonflyoss/scheduler:latest
docker pull dragonflyoss/manager:latest
docker pull dragonflyoss/dfdaemon:latest
Kind 集群加载 Dragonfly Latest 镜像:
kind load docker-image dragonflyoss/scheduler:latest
kind load docker-image dragonflyoss/manager:latest
kind load docker-image dragonflyoss/dfdaemon:latest
基于 Helm Charts 创建 Dragonfly 集群
创建 Helm Charts 配置文件 charts-config.yaml。可以根据对象存储的下载路径修改dfdaemon.config.proxy.proxies.regx来调整路由匹配规则,示例中默认匹配了 AWS S3 的请求,配置如下:
scheduler:
  image:
    repository: dragonflyoss/scheduler
    tag: latest
  replicas: 1
  metrics:
    enable: true
  config:
    verbose: true
    pprofPort: 18066

seedPeer:
  image:
    repository: dragonflyoss/dfdaemon
    tag: latest
  replicas: 1
  metrics:
    enable: true
  config:
    verbose: true
    pprofPort: 18066

dfdaemon:
  image:
    repository: dragonflyoss/dfdaemon
    tag: latest
  metrics:
    enable: true
  config:
    verbose: true
    pprofPort: 18066
    proxy:
      defaultFilter: 'Expires&Signature&ns'
      security:
        insecure: true
        cacert: ''
        cert: ''
        key: ''
      tcpListen:
        namespace: ''
        port: 65001
      registryMirror:
        url: https://index.docker.io
        insecure: true
        certs: []
        direct: false
      proxies:
        - regx: blobs/sha256.*
        - regx: .*amazonaws.*

manager:
  image:
    repository: dragonflyoss/manager
    tag: latest
  replicas: 1
  metrics:
    enable: true
  config:
    verbose: true
    pprofPort: 18066

jaeger:
  enable: true
使用配置文件部署 Dragonfly Helm Charts:
$ helm repo add dragonfly https://dragonflyoss.github.io/helm-charts/
$ helm install --wait --create-namespace --namespace dragonfly-system dragonfly dragonfly/dragonfly -f charts-config.yaml
LAST DEPLOYED: Mon Sep  4 10:24:55 2023
NAMESPACE: dragonfly-system
STATUS: deployed
REVISION: 1
TEST SUITE: None
NOTES:
1. Get the scheduler address by running these commands:
  export SCHEDULER_POD_NAME=$(kubectl get pods --namespace dragonfly-system -l "app=dragonfly,release=dragonfly,component=scheduler" -o jsonpath={.items[0].metadata.name})
  export SCHEDULER_CONTAINER_PORT=$(kubectl get pod --namespace dragonfly-system $SCHEDULER_POD_NAME -o jsonpath="{.spec.containers[0].ports[0].containerPort}")
  kubectl --namespace dragonfly-system port-forward $SCHEDULER_POD_NAME 8002:$SCHEDULER_CONTAINER_PORT
  echo "Visit http://127.0.0.1:8002 to use your scheduler"

2. Get the dfdaemon port by running these commands:
  export DFDAEMON_POD_NAME=$(kubectl get pods --namespace dragonfly-system -l "app=dragonfly,release=dragonfly,component=dfdaemon" -o jsonpath={.items[0].metadata.name})
  export DFDAEMON_CONTAINER_PORT=$(kubectl get pod --namespace dragonfly-system $DFDAEMON_POD_NAME -o jsonpath="{.spec.containers[0].ports[0].containerPort}")
  You can use $DFDAEMON_CONTAINER_PORT as a proxy port in Node.

3. Configure runtime to use dragonfly:
  https://d7y.io/docs/getting-started/quick-start/kubernetes/


4. Get Jaeger query URL by running these commands:
  export JAEGER_QUERY_PORT=$(kubectl --namespace dragonfly-system get services dragonfly-jaeger-query -o jsonpath="{.spec.ports[0].port}")
  kubectl --namespace dragonfly-system port-forward service/dragonfly-jaeger-query 16686:$JAEGER_QUERY_PORT
  echo "Visit http://127.0.0.1:16686/search?limit=20&lookback=1h&maxDuration&minDuration&service=dragonfly to query download events"
检查 Dragonfly 是否部署成功:
$ kubectl get po -n dragonfly-system
NAME                                 READY   STATUS    RESTARTS      AGE
dragonfly-dfdaemon-7r2cn             1/1     Running   0          3m31s
dragonfly-dfdaemon-fktl4             1/1     Running   0          3m31s
dragonfly-jaeger-c7947b579-2xk44     1/1     Running   0          3m31s
dragonfly-manager-5d4f444c6c-wq8d8   1/1     Running   0          3m31s
dragonfly-mysql-0                    1/1     Running   0          3m31s
dragonfly-redis-master-0             1/1     Running   0          3m31s
dragonfly-redis-replicas-0           1/1     Running   0          3m31s
dragonfly-redis-replicas-1           1/1     Running   0          3m5s
dragonfly-redis-replicas-2           1/1     Running   0          2m44s
dragonfly-scheduler-0                1/1     Running   0          3m31s
dragonfly-seed-peer-0                1/1     Running   0          3m31s
暴露 Proxy 服务端口
创建 dfstore.yaml 配置文件,暴露 Dragonfly Peer 的 HTTP Proxy 服务监听的端口,用于和 TorchServe 交互。
targetPort 如果未在 charts-config.yaml 中修改默认为65001, port 可根据实际情况设定值,建议也使用 65001。
kind: Service
apiVersion: v1
metadata:
  name: dfstore
spec:
  selector:
    app: dragonfly
    component: dfdaemon
    release: dragonfly

  ports:
    - protocol: TCP
      port: 65001
      targetPort: 65001

  type: NodePort
创建 Service:
kubectl --namespace dragonfly-system apply -f dfstore.yaml
将本地的65001端口流量转发至 Dragonfly 的 Proxy 服务:
kubectl --namespace dragonfly-system port-forward service/dfstore 65001:65001
安装 Dragonfly Endpoint 插件
设置 Dragonfly Endpoint 配置的环境变量
创建 config.json 配置文件,并将 DRAGONFLY_ENDPOINT_CONFIG 环境变量配置为 config.json 文件路径。
export DRAGONFLY_ENDPOINT_CONFIG=/etc/dragonfly-endpoint/config.json
默认读取路径为:
- linux:
/etc/dragonfly-endpoint/config.json - darwin:
~/.dragonfly-endpoint/config.json
Dragonfly Endpoint 插件配置
创建 config.json 配置文件,对 Torchserve 插件进行配置。下面是 S3 的配置:
{
  "addr": "http://127.0.0.1:65001",
  "header": {},
  "filter": [
    "X-Amz-Algorithm",
    "X-Amz-Credential",
    "X-Amz-Date",
    "X-Amz-Expires",
    "X-Amz-SignedHeaders",
    "X-Amz-Signature"
  ],
  "object_storage": {
    "type": "s3",
    "bucket_name": "your_s3_bucket_name",
    "region": "your_s3_access_key",
    "access_key": "your_s3_access_key",
    "secret_key": "your_s3_access_key"
  }
}
- addr: Drangonfly 的 Peer 的 HTTP Proxy 的地址。
- header: 为请求增加请求头。
- filter: 用于生成唯一的任务,并过滤 URL 中不必要的查询参数。
- object_storage: 模型文件所在对象存储的配置,其中 type 可为 s3,oss,abs 和 gcs。
配置文件中的 filter 部分, 根据对象存储类型设置不同值:
| 类型 | 值 |
|---|---|
| OSS | ["Expires","Signature","ns"] |
| S3 | ["X-Amz-Algorithm", "X-Amz-Credential", "X-Amz-Date", "X-Amz-Expires", "X-Amz-SignedHeaders", "X-Amz-Signature"] |
| OBS | ["X-Amz-Algorithm", "X-Amz-Credential", "X-Amz-Date", "X-Obs-Date", "X-Amz-Expires", "X-Amz-SignedHeaders", "X-Amz-Signature"] |
对象存储配置
除 S3 外,Dragonfly 的 TorchServe 插件还支持 OSS,GCS,ABS。不同的对象存储配置如下: OSS(Object Storage Service)
{
  "addr": "http://127.0.0.1:65001",
  "header": {},
  "filter": ["Expires", "Signature"],
  "object_storage": {
    "type": "oss",
    "bucket_name": "your_oss_bucket_name",
    "endpoint": "your_oss_endpoint",
    "access_key_id": "your_oss_access_key_id",
    "access_key_secret": "your_oss_access_key_secret"
  }
}
GCS(Google Cloud Storage)
  "addr": "http://127.0.0.1:65001",
  "header": {},
  "object_storage": {
    "type": "gcs",
    "bucket_name": "your_gcs_bucket_name",
    "project_id": "your_gcs_project_id",
    "service_account_path": "your_gcs_service_account_path"
  }
}
ABS(Azure Blob Storage)
{
  "addr": "http://127.0.0.1:65001",
  "header": {},
  "object_storage": {
    "type": "abs",
    "account_name": "your_abs_account_name",
    "account_key": "your_abs_account_key",
    "container_name": "your_abs_container_name"
  }
}
TorchServe 集成 Dragonfly Endpoint 插件
TorchServe 在不同生产环境下使用的具体文档可参考 TorchServe 文档。以下提供二种部署方式, 推荐使用 Docker 容器化部署:
二进制安装
插件依赖
| 所需软件 | Header2 | Header3 |
|---|---|---|
| Python | 3.8.0+ | https://www.python.org/ |
| TorchServe | 0.4.0+ | pytorch.org/serve/ |
| Java | 11 | https://openjdk.org/projects/jdk/11/ |
安装 TorchServe 依赖和 torch-model-archiver:
python ./ts_scripts/install_dependencies.py
conda install torchserve torch-model-archiver torch-workflow-archiver -c pytorch
克隆 TorchServe 存储库:
git clone https://github.com/pytorch/serve.git
cd serve
创建 model-store 目录用来存储模型文件:
mkdir model-store
chmod 777 model-store
创建 plugins-path 目录用来存储插件的二进制文件:
mkdir plugins-path
打包 Dragonfly Endpoint 插件
下载 dragonfly-endpoint 项目:
git clone https://github.com/dragonflyoss/dragonfly-endpoint.git
打包 dragonfly-endpoint 项目,在 build/libs 目录下生成文件:
cd ./dragonfly-endpoint
gradle shadowJar
注意:因为 TorchServe 自身 JVM 的限制,Gradle 的 Java 版本号最好为 11,版本号过高会导致插件无法解析。
将 Jar 文件放入之前创建好的 plugins-path 目录下:
mv build/libs/dragonfly_endpoint-1.0-all.jar <your plugins-path>
准备插件的配置文件 config.json,对象存储仍以 S3 为例:
{
    "addr": "http://127.0.0.1:65001",
    "header": {
    },
    "filter": [
        "X-Amz-Algorithm",
        "X-Amz-Credential",
    "X-Amz-Date",
    "X-Amz-Expires",
    "X-Amz-SignedHeaders",
    "X-Amz-Signature"
    ],
    "object_storage": {
        "type": "s3",
        "bucket_name": "your_s3_bucket_name",
        "region": "your_s3_access_key",
        "access_key": "your_s3_access_key",
        "secret_key": "your_s3_access_key"
    }
}
设置配置文件的环境变量:
export DRAGONFLY_ENDPOINT_CONFIG=/etc/dragonfly-endpoint/config.json
--model-store 使用之前创建的存储模型目录,--plugins-path 使用之前创建的存储插件的目录。启动 TorchServe 使用 Dragonfly Endpoint 插件 :
torchserve --start --model-store <path-to-model-store-file> --plugins-path=<path-to-plugin-jars>
功能验证(二进制插件)
准备模型文件。请直接到 Model ZOO 中下载现成的模型文件 .mar
或者参考 Torch Model archiver for TorchServe
打包自己模型文件。以 squeezenet1_1_scripted.mar 模型为例:
wget https://torchserve.pytorch.org/mar_files/squeezenet1_1_scripted.mar
上传模型到对象存储,以下以 S3 为例,具体参考 S3:
# 下载命令行工具
pip install awscli
# 根据提示配置密钥等
aws configure
# 上传文件
aws s3 cp <本地文件路径> s3://<存储桶名称>/<目标路径>
TorchServe 插件名称为 dragonfly,插件 API 的详细参数请参考 TorchServe Register API,
不支持 url 参数,并增加参数 file_name 参数 ,即需要下载的模型文件名称。
发送下载请求进行测试:
curl -X POST "http://localhost:8081/dragonfly/models?file_name=squeezenet1_1.mar"
正确响应:
{
    "Status": "Model "squeezenet1_1" Version: 1.0 registered with 0 initial workers. Use scale workers API to add workers for the model."
}
增加模型的 Worker 用于推理:
curl -v -X PUT "http://localhost:8081/models/squeezenet1_1?min_worker=1"
模型的 Worker 数量增加成功,响应如下:
* About to connect() to localhost port 8081 (#0)
*   Trying ::1...
* Connected to localhost (::1) port 8081 (#0)
> PUT /models/squeezenet1_1?min_worker=1 HTTP/1.1
> User-Agent: curl/7.29.0
> Host: localhost:8081
> Accept: */*
>
< HTTP/1.1 202 Accepted
< content-type: application/json
< x-request-id: 66761b5a-54a7-4626-9aa4-12041e0e4e63
< Pragma: no-cache
< Cache-Control: no-cache; no-store, must-revalidate, private
< Expires: Thu, 01 Jan 1970 00:00:00 UTC
< content-length: 47
< connection: keep-alive
<
{
  "status": "Processing worker updates..."
}
* Connection #0 to host localhost left intact
调用推理 API:
# 准备需要推理的图片
curl -O  https://raw.githubusercontent.com/pytorch/serve/master/docs/images/kitten_small.jpg
curl -O  https://raw.githubusercontent.com/pytorch/serve/master/docs/images/dogs-before.jpg

# 调用推理 API
curl http://localhost:8080/predictions/squeezenet1_1 -T kitten_small.jpg -T dogs-before.jpg
推理 API 成功调用后的响应:
{
  "lynx": 0.5455784201622009,
  "tabby": 0.2794168293476105,
  "Egyptian_cat": 0.10391931980848312,
  "tiger_cat": 0.062633216381073,
  "leopard": 0.005019133910536766
}
Docker 部署 TorchServe
Docker 配置
拉取自带插件的 dragonflyoss/dragonfly-endpoint 镜像。
以下为 CPU 版的 TorchServe 为例子。构建细节参考 Dockerfile。
docker pull dragonflyoss/dragonfly-endpoint
创建 model-store 目录用来存储模型文件:
mkdir model-store
chmod 777 model-store
准备插件的配置文件 config.json,对象存储仍以 S3 为例:
{
    "addr": "http://127.0.0.1:65001",
    "header": {
    },
    "filter": [
        "X-Amz-Algorithm",
        "X-Amz-Credential&X-Amz-Date",
    "X-Amz-Expires",
    "X-Amz-SignedHeaders",
    "X-Amz-Signature"
    ],
    "object_storage": {
        "type": "s3",
        "bucket_name": "your_s3_bucket_name",
        "region": "your_s3_access_key",
        "access_key": "your_s3_access_key",
        "secret_key": "your_s3_access_key"
    }
}
设置配置文件的环境变量:
export DRAGONFLY_ENDPOINT_CONFIG=/etc/dragonfly-endpoint/config.json
运行容器并 mount model-store 和 dragonfly-endpoint 配置目录:
# 使用环境变量的配置路径
sudo docker run --rm -it --network host -v $(pwd)/model-store:/home/model-server/model-store  -v ${DRAGONFLY_ENDPOINT_CONFIG}:${DRAGONFLY_ENDPOINT_CONFIG} dragonflyoss/dragonfly-endpoint:latest
功能验证(容器镜像)
准备模型文件。请直接到 Model ZOO 中下载现成的模型文件 .mar 或者
参考 Torch Model archiver for TorchServe 打包自己模型文件。
以 squeezenet1_1_scripted.mar 模型为例:
wget https://torchserve.pytorch.org/mar_files/squeezenet1_1_scripted.mar
上传模型到对象存储,以下以 S3 为例,具体参考 S3:
# 下载命令行工具
pip install awscli
# 根据提示配置密钥等
aws configure
# 上传文件
aws s3 cp <本地文件路径> s3://<存储桶名称>/<目标路径>
TorchServe 插件名称为 dragonfly,在 TorchServe 的管理接口下监听。
插件 API 的详细参数请参考 TorchServe Register API (仅不支持 url 参数),
并增加参数 file_name ,即需要下载的模型文件。
发送下载请求进行测试:
curl -X POST "http://localhost:8081/dragonfly/models?file_name=squeezenet1_1.mar"
正确响应:
{
    "Status": "Model "squeezenet1_1" Version: 1.0 registered with 0 initial workers. Use scale workers API to add workers for the model."
}
增加模型的 Worker 用于推理:
curl -v -X PUT "http://localhost:8081/models/squeezenet1_1?min_worker=1"
模型的 Worker 数量增加成功,响应如下:
* About to connect() to localhost port 8081 (#0)
*   Trying ::1...
* Connected to localhost (::1) port 8081 (#0)
> PUT /models/squeezenet1_1?min_worker=1 HTTP/1.1
> User-Agent: curl/7.29.0
> Host: localhost:8081
> Accept: */*
>
< HTTP/1.1 202 Accepted
< content-type: application/json
< x-request-id: 66761b5a-54a7-4626-9aa4-12041e0e4e63
< Pragma: no-cache
< Cache-Control: no-cache; no-store, must-revalidate, private
< Expires: Thu, 01 Jan 1970 00:00:00 UTC
< content-length: 47
< connection: keep-alive
<
{
  "status": "Processing worker updates..."
}
* Connection #0 to host localhost left intact
调用推理 API:
# 准备需要推理的图片
curl -O  https://raw.githubusercontent.com/pytorch/serve/master/docs/images/kitten_small.jpg
curl -O  https://raw.githubusercontent.com/pytorch/serve/master/docs/images/dogs-before.jpg

# 调用推理 API
curl http://localhost:8080/predictions/squeezenet1_1 -T kitten_small.jpg -T dogs-before.jpg
推理 API 成功调用后的响应:
{
  "lynx": 0.5455784201622009,
  "tabby": 0.2794168293476105,
  "Egyptian_cat": 0.10391931980848312,
  "tiger_cat": 0.062633216381073,
  "leopard": 0.005019133910536766
}
性能测试
测试在单机情况下,集成 Dragonfly 后下载模型的性能对比。使用的对象存储是 OSS,由于机器本身网络环境、配置等影响, 实际下载时间不具有参考价值。不同场景下下载速度对应的比例较有意义。
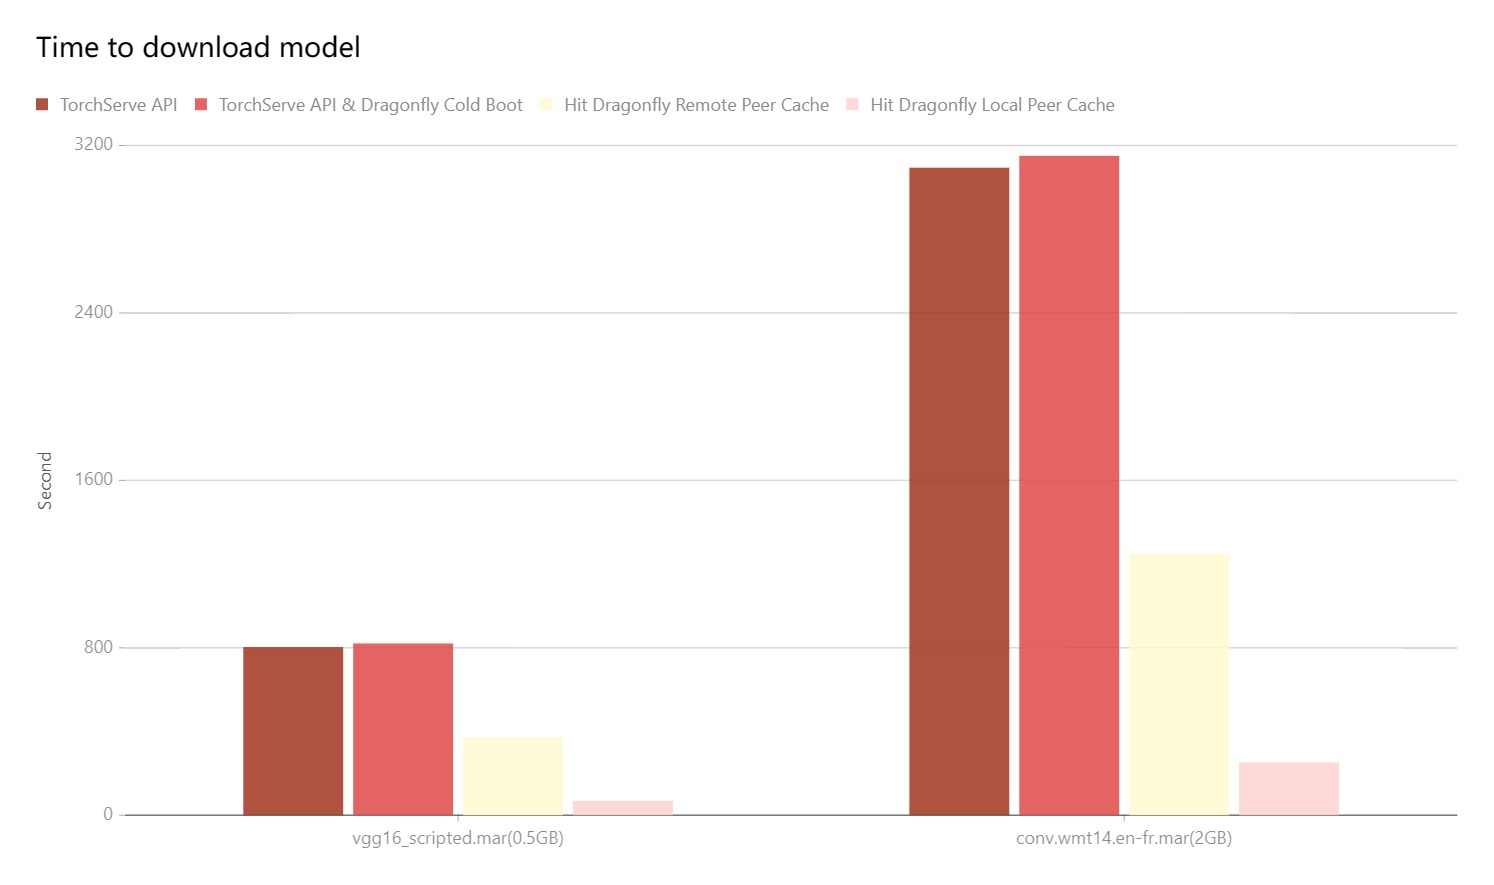
- TorchServe API: 直接通过 URL 下载对象存储里的模型文件。
- TorchServe API & Dragonfly Cold Boot:通过 Dragonfly 代理模式进行回源下载,没有命中任何缓存所花费的时间。
- Hit Remote Peer: 通过 Dragonfly 代理模式,在命中 Dragonfly 的远端 Peer 缓存的情况下的下载时间。
- Hit Local Peer: 通过 Dragonfly 代理模式,在命中 Dragonfly 的本地 Peer 缓存的情况下的下载时间。
测试结果表明 TorchServe 集成 Dragonfly,能有效减少下载时间。在命中缓存 ,尤其是本地缓存的情况下有较大的提升。 即使是回源下载的性能也和直接下载的相差无几。注意的是本次测试为单机测试,意味着在命中缓存的情况下,性能瓶颈主要在磁盘。 如果是多台机器部署的 Dragonfly 进行 P2P 下载的情况,模型下载速度会更快。