eStargz
This document will help you experience how to use dragonfly with eStargz.
Prerequisites
| Name | Version | Document |
|---|---|---|
| Kubernetes cluster | 1.20+ | kubernetes.io |
| Helm | 3.8.0+ | helm.sh |
| Containerd | v1.4.3+ | containerd.io |
| Nerdctl | 0.22+ | containerd/nerdctl |
Notice: Kind is recommended if no kubernetes cluster is available for testing.
Install dragonfly
For detailed installation documentation based on kubernetes cluster, please refer to quick-start-kubernetes.
Setup kubernetes cluster
Create kind multi-node cluster configuration file kind-config.yaml, configuration content is as follows:
kind: Cluster
apiVersion: kind.x-k8s.io/v1alpha4
nodes:
  - role: control-plane
  - role: worker
    extraPortMappings:
      - containerPort: 30950
        hostPort: 65001
      - containerPort: 30951
        hostPort: 40901
  - role: worker
Create a kind multi-node cluster using the configuration file:
kind create cluster --config kind-config.yaml
Switch the context of kubectl to kind cluster:
kubectl config use-context kind-kind
Kind loads dragonfly image
Pull dragonfly latest images:
docker pull dragonflyoss/scheduler:latest
docker pull dragonflyoss/manager:latest
docker pull dragonflyoss/dfdaemon:latest
Kind cluster loads dragonfly latest images:
kind load docker-image dragonflyoss/scheduler:latest
kind load docker-image dragonflyoss/manager:latest
kind load docker-image dragonflyoss/dfdaemon:latest
Create dragonfly cluster based on helm charts
Create helm charts configuration file charts-config.yaml and enable prefetching, configuration content is as follows:
scheduler:
  replicas: 1
  metrics:
    enable: true
  config:
    verbose: true
    pprofPort: 18066

seedPeer:
  replicas: 1
  metrics:
    enable: true
  config:
    verbose: true
    pprofPort: 18066
    download:
      prefetch: true

dfdaemon:
  hostNetwork: true
  config:
    verbose: true
    pprofPort: 18066
    # ":" is necessary for metrics value
    metrics: :8000
    download:
      prefetch: true
    proxy:
      defaultFilter: 'Expires&Signature&ns'
      security:
        insecure: true
      tcpListen:
        listen: 0.0.0.0
        port: 65001
      registryMirror:
        dynamic: true
        url: https://index.docker.io
      proxies:
        - regx: blobs/sha256.*

manager:
  replicas: 1
  metrics:
    enable: true
  config:
    verbose: true
    pprofPort: 18066
Create a dragonfly cluster using the configuration file:
$ helm repo add dragonfly https://dragonflyoss.github.io/helm-charts/
$ helm install --wait --create-namespace --namespace dragonfly-system dragonfly dragonfly/dragonfly -f charts-config.yaml
NAME: dragonfly
LAST DEPLOYED: Wed Oct 19 04:23:22 2022
NAMESPACE: dragonfly-system
STATUS: deployed
REVISION: 1
TEST SUITE: None
NOTES:
1. Get the scheduler address by running these commands:
  export SCHEDULER_POD_NAME=$(kubectl get pods --namespace dragonfly-system -l "app=dragonfly,release=dragonfly,component=scheduler" -o jsonpath={.items[0].metadata.name})
  export SCHEDULER_CONTAINER_PORT=$(kubectl get pod --namespace dragonfly-system $SCHEDULER_POD_NAME -o jsonpath="{.spec.containers[0].ports[0].containerPort}")
  kubectl --namespace dragonfly-system port-forward $SCHEDULER_POD_NAME 8002:$SCHEDULER_CONTAINER_PORT
  echo "Visit http://127.0.0.1:8002 to use your scheduler"

2. Get the dfdaemon port by running these commands:
  export DFDAEMON_POD_NAME=$(kubectl get pods --namespace dragonfly-system -l "app=dragonfly,release=dragonfly,component=dfdaemon" -o jsonpath={.items[0].metadata.name})
  export DFDAEMON_CONTAINER_PORT=$(kubectl get pod --namespace dragonfly-system $DFDAEMON_POD_NAME -o jsonpath="{.spec.containers[0].ports[0].containerPort}")
  You can use $DFDAEMON_CONTAINER_PORT as a proxy port in Node.

3. Configure runtime to use dragonfly:
  https://d7y.io/docs/getting-started/quick-start/kubernetes/
Check that dragonfly is deployed successfully:
$ kubectl get po -n dragonfly-system
NAME                                 READY   STATUS    RESTARTS       AGE
dragonfly-dfdaemon-rhnr6             1/1     Running   4 (101s ago)   3m27s
dragonfly-dfdaemon-s6sv5             1/1     Running   5 (111s ago)   3m27s
dragonfly-manager-67f97d7986-8dgn8   1/1     Running   0              3m27s
dragonfly-mysql-0                    1/1     Running   0              3m27s
dragonfly-redis-master-0             1/1     Running   0              3m27s
dragonfly-redis-replicas-0           1/1     Running   1 (115s ago)   3m27s
dragonfly-redis-replicas-1           1/1     Running   0              95s
dragonfly-redis-replicas-2           1/1     Running   0              70s
dragonfly-scheduler-0                1/1     Running   0              3m27s
dragonfly-seed-peer-0                1/1     Running   2 (95s ago)    3m27s
Create peer service configuration file peer-service-config.yaml, configuration content is as follows:
apiVersion: v1
kind: Service
metadata:
  name: peer
  namespace: dragonfly-system
spec:
  type: NodePort
  ports:
    - name: http-65001
      nodePort: 30950
      port: 65001
    - name: http-40901
      nodePort: 30951
      port: 40901
  selector:
    app: dragonfly
    component: dfdaemon
    release: dragonfly
Create a peer service using the configuration file:
kubectl apply -f peer-service-config.yaml
Install stargz for containerd
For detailed stargz installation documentation based on containerd environment, please refer to
stargz-setup-for-containerd-environment.
The example uses Systemd to manage the stargz-snapshotter service.
Install stargz tools
Download containerd-stargz-grpc binary, please refer to stargz-snapshotter/releases:
STARGZ_SNAPSHOTTER_VERSION=0.13.0
wget https://github.com/containerd/stargz-snapshotter/releases/download/stargz-snapshotter-v$STARGZ_SNAPSHOTTER_VERSION-linux-amd64.tar.gz
tar -C /usr/local/bin -xvf stargz-snapshotter-v$STARGZ_SNAPSHOTTER_VERSION-linux-amd64.tar.gz containerd-stargz-grpc ctr-remote
Install stargz snapshotter plugin for containerd
Configure containerd to use the stargz-snapshotter plugin, please refer to
configure-and-start-containerd.
Change configuration of containerd in /etc/containerd/config.toml:
[plugins."io.containerd.grpc.v1.cri".containerd]
  snapshotter = "stargz"
  disable_snapshot_annotations = false

[proxy_plugins]
  [proxy_plugins.stargz]
    type = "snapshot"
    address = "/run/containerd-stargz-grpc/containerd-stargz-grpc.sock"
Restart containerd service:
sudo systemctl restart containerd
Check that containerd uses the stargz-snapshotter plugin:
$ ctr -a /run/containerd/containerd.sock plugin ls | grep stargz
io.containerd.snapshotter.v1          stargz                    -              ok
Systemd starts stargz snapshotter service
For detailed configuration documentation based on stargz mirror mode, please refer to stargz-registry-mirrors.
127.0.0.1:65001 is the proxy address of dragonfly peer,
and the X-Dragonfly-Registry header is the address of origin registry,
which is provided for dragonfly to download the images.
Create stargz configuration file config.toml, configuration content is as follows:
[[resolver.host."docker.io".mirrors]]
  host = "127.0.0.1:65001"
  insecure = true
  [resolver.host."docker.io".mirrors.header]
    X-Dragonfly-Registry = ["https://index.docker.io"]
Copy configuration file to /etc/containerd-stargz-grpc/config.toml:
sudo mkdir /etc/containerd-stargz-grpc && cp config.toml /etc/containerd-stargz-grpc/config.toml
Download systemd configuration file stargz-snapshotter.service of stargz snapshotter, configuration content is as follows:
wget -O /etc/systemd/system/stargz-snapshotter.service https://raw.githubusercontent.com/containerd/stargz-snapshotter/main/script/config/etc/systemd/system/stargz-snapshotter.service
systemctl enable --now stargz-snapshotter
systemctl restart containerd
Convert an image to stargz format
Convert python:3.9.15 image to stargz format, you can use
the converted dragonflyoss/python:3.9.15-esgz image and skip this step.
Login to Dockerhub:
docker login
Convert python:3.9.15 image to stargz format, and DOCKERHUB_REPO_NAME environment variable
needs to be set to the user's image repository:
DOCKERHUB_REPO_NAME=dragonflyoss
sudo nerdctl pull python:3.9.15
sudo nerdctl image convert --estargz --oci python:3.9.15 $DOCKERHUB_REPO_NAME/python:3.9.15-esgz
sudo nerdctl image push $DOCKERHUB_REPO_NAME/python:3.9.15-esgz
Try stargz with nerdctl
Running python:3.9.15-esgz with nerdctl:
sudo nerdctl --snapshotter stargz run --rm -it $DOCKERHUB_REPO_NAME/python:3.9.15-esgz
Check that stargz is downloaded via dragonfly based on mirror mode:
$ journalctl -u stargz-snapshotter | grep 'prepared remote snapshot'
containerd-stargz-grpc[641210]: {"key":"default/102/extract-937057799-P18P sha256:3c17c21e4512b29e8cfc1c8621f91e4284ce2dcc5080a348c7ba4f47eaba6f11","level":"debug","msg":"prepared remote snapshot","parent":"sha256:4f9bea3e771997ae09192ddf4bd59c844444c671174835446759a82e457f1aed","remote-snapshot-prepared":"true","time":"2022-11-04T03:53:03.945119325Z"}
Performance testing
Test the performance of single-machine image download after the integration of
stargz mirror mode and dragonfly P2P.
Test running version commands using images in different languages.
For example, the startup command used to run a python image is python -V.
The tests were performed on the same machine.
Due to the influence of the network environment of the machine itself,
the actual download time is not important, but the ratio of the increase in
the download time in different scenarios is very important.
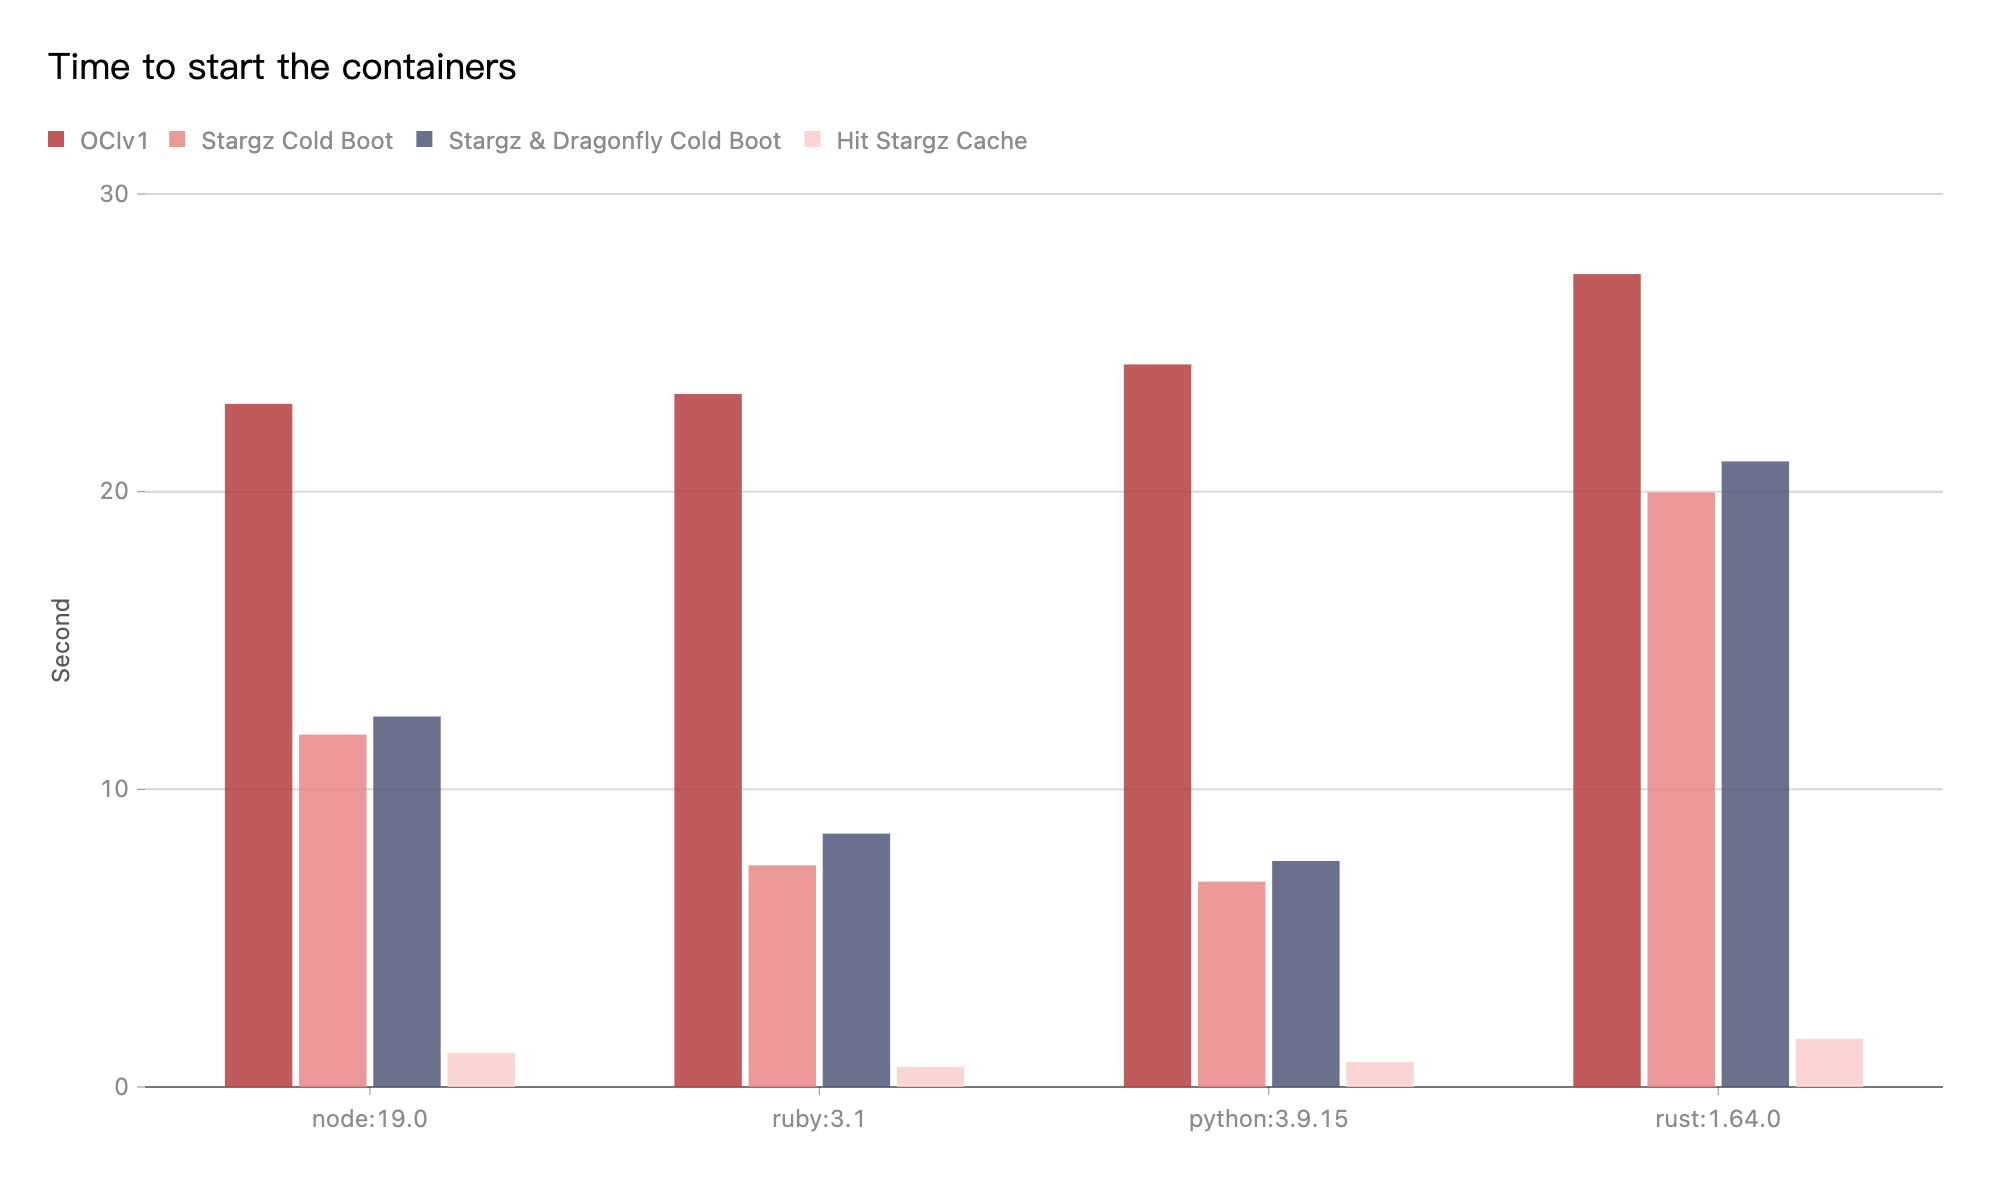
- OCIv1: Use containerd to pull image directly.
- Stargz Cold Boot: Use containerd to pull image via stargz-snapshotter and doesn't hit any cache.
- Stargz & Dragonfly Cold Boot: Use containerd to pull image via stargz-snapshotter. Transfer the traffic to dragonfly P2P based on stargz mirror mode and no cache hits.
Test results show stargz mirror mode and dragonfly P2P integration.
Use the stargz download image to compare the OCIv1 mode,
It can effectively reduce the image download time.
The cold boot of stargz and stargz & dragonfly are basically close.
The most important thing is that if a very large kubernetes cluster uses stargz to pull images.
The download of each image layer will be generate as many range requests as needed.
The QPS of the source of the registry is too high.
Causes the QPS of the registry to be relatively high.
Dragonfly can effectively reduce the number of requests and
download traffic for back-to-source registry.
In the best case, dragonfly can make the same task back-to-source download only once.